
We wanted wedding invites that were Dr Who related. It was easy to find general invitations that people have made and were selling on Etsy and other websites, but they were either too expensive for the amount we needed or just not quite what we wanted. So, as we did with the Save the Dates, we made our own! We had lots of fun making them and hope everyone is enjoying them. Here is how we made them:
STEP ONE: Collect, make, and print up all the pieces.
* Supplies: Tardis Blue (or as close as you can) premium copy paper, regular white copy paper, glue sticks, extra black ink for the printer.
* Pieces needed to print up: Outline of tardis front, windows, “police box” sign, and “police telephone” sign. (You can search images online for any of these. We liked the display of the TARDIS front from LizQuilty but did some editing.)
*** NOTES: We used a TARDIS front display that was more of an outline with no color because we printed on blue paper. Then we printed the other pieces on plain white paper. This saved on ink (especially the color ink which can be more expensive to replace.)
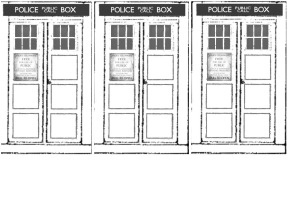
Tardis Front Display.

The Windows.

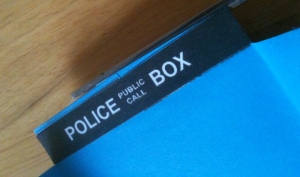
Police Box Sign.
Police Telephone Sign.
STEP TWO: Cut all the pieces out. Make sure to size everything and trim down.
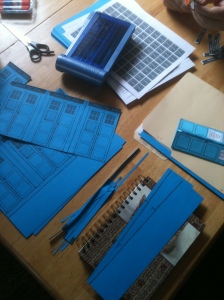
I could only fit three TARDIS fronts on one page for the size I wanted. Save scraps for something. 🙂


STEP THREE: Grab your stack of the TARDIS fronts and set aside all the other pieces. It’s time to cut apart the fronts.

Trim down any sides that need it.

Cut the TARDIS fronts evenly down the middle. Make sure to put them in two sepate stacks.
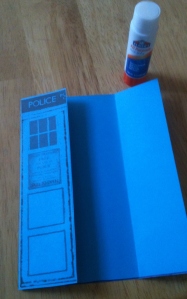
STEP FOUR: Time to cut out your base for the invitations and glue the front panels.
** You’ll need more of the blue paper. If able, a heavier paper of the same blue would make the card thicker if that is your preference.
**** This is where having a demo card done will be handy.
* Glue the panel *with the telephone sign* along the edges of the top right of the paper.
* Using a ruler and pencil,line up the ruler to go along the bottom of the panel and evenly across there paper to the other side. Create your base line starting along the bottom of the panel and going along the ruler to the left. Cut this piece out.

* Now flip over the piece of paper you have cut out. Fold the left side in. This will be the side that comes up with the panel you glued on. Fold to create your first door.
* Grab a front panel (without the telephone sign) and place on the paper, lining up against the glued on panel. Now, fold the right side of the paper over the loose panel, creating a folded edge that will be for the right panel. Once you have this edge folded, you can glue that panel to the outside along the right edge and know where to cut off extra paper.


***** NOTE: that you have this piece made, you can trim edges where needed and use this first one as a stencil to cut out the base pieces for the other cards quickly for easier assembly. It will be easier than doing this step each time for each card made.*****
* Once you have base pieces already cut to sixe, all you have to do is: Glue the panel with no sign along the left edge. Glue the panel with the telephone sign along the right edge. Fold both along iside edges where they come together creating your door.
STEP FIVE: Police Box SIGN.
* If you are fine with the sign being dull, then you can adjust how you want to cut out your TARDIS outline, but I wanted it more bold than the outline.
* Cut along the bottom of the Police Box sign at the top of each panel side. You are not cutting it off. Only cut to create a loose tab.

* Glue the tabs back down. They may not match up or even touch each other. This is fine. You just want to make sure the bottom edges are even (not necessarly touching). Yiou don’t want anything sticking out from under the new Police Box cutout. Later you will be able to trim the top but not the bottom.

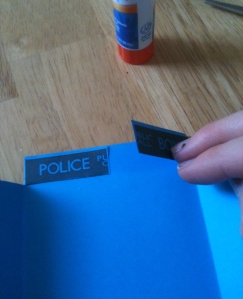
* Now time to glue the new Police Box sign on top. Line the bottom edges of the old and new signs while making sure it is centered with the text. You can always trim the top and the sides if needed.

STEP SIX: Glue on all your pieces and insert your wedding information.
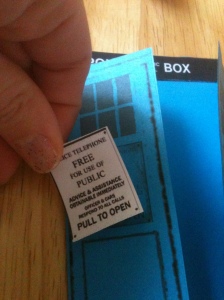
Glue on your new Police Telephone Sign over the old one.
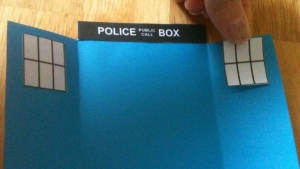
We chose to put the windows on the inside of the doors. They seemed to give the inside of the card more detail.
**** Now time for any trimming needed!
Final Result:
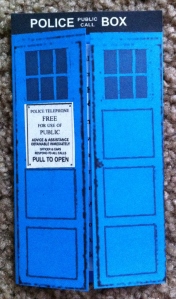
Outside

Inside
We hope you enjoyed seeing how we made our invitations. We worked hard on them and are pleased with how they turned out. Check out the RSVP cards we made, too!
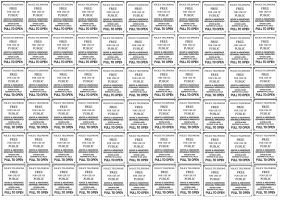
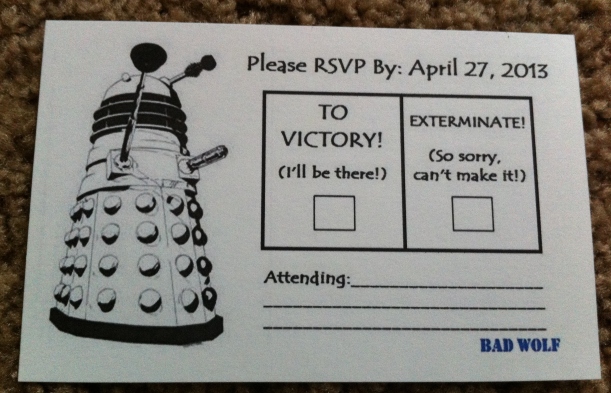
If you’re going to have Dr Who themed invitations, it’s only natural to have Dr Who related RSVP cards! I simply searched for a basic outlined clipart of a Dalek. Something that would fit perfectly with what I had in my mind for the card set up. The rest just came togther. And of course any Dr Who fan will understand “Bad Wolf”.
I was able to fit four onto one page of card stock for the size I wanted. I simply put address labels of the guest and us on the other side and pre-stamped. And it became an easy RSVP card that our guests could respond on and drop back in the mail to us.
– Lauren.


You must be logged in to post a comment.